

How to Clean a Glock Pistol: Complete Maintenance Guide
Glock pistols have earned their reputation as some of the most reliable firearms on the market, but that reliability depends on proper maintenance. Whether you've just returned from a day at the range or you're performing routine maintenance, understanding how to clean a Glock pistol correctly ensures your firearm performs flawlessly when you need it most. This comprehensive guide walks through the entire cleaning process, from essential tools to final inspection, helping both new and experienced shooters maintain their Glocks in peak condition.
Essential Tools and Materials for Glock Cleaning
Before beginning the cleaning process, assembling the right tools makes the job efficient and thorough. The proper equipment prevents damage to your firearm and ensures every component receives appropriate care.
Required Cleaning Supplies
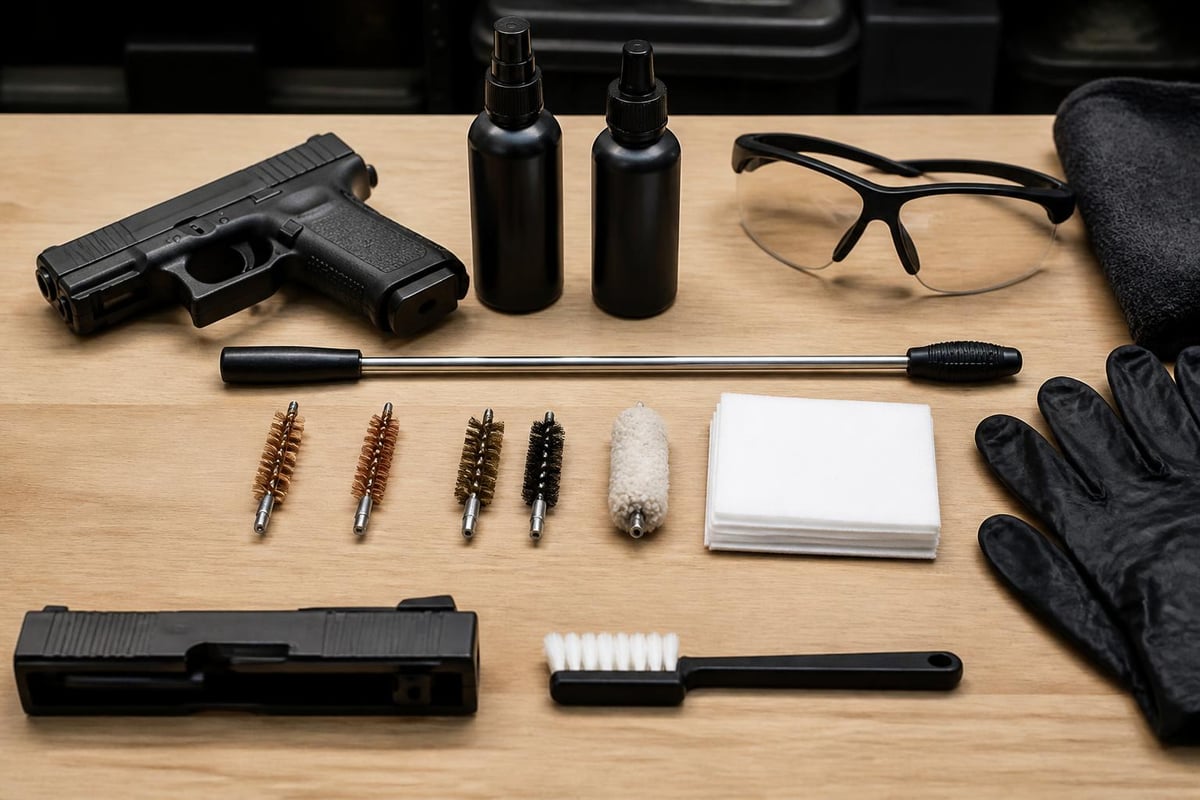
Quality cleaning supplies protect your investment and streamline the maintenance process. Here's what you'll need:
- Bore brush (9mm, .40, .45, or 10mm depending on your model)
- Cleaning patches (appropriately sized for your caliber)
- Cleaning rod or bore snake for barrel maintenance
- Nylon brushes for frame and slide cleaning
- Gun cleaning solvent (CLP or similar quality cleaner)
- Gun lubricant (high-quality firearm oil)
- Microfiber cloths for wiping and polishing
- Cotton swabs for detail work
- Cleaning mat to protect your work surface
A Glock armorer's tool simplifies disassembly, though many shooters successfully use a punch or similar tool. Investing in a comprehensive cleaning kit saves time and ensures you have everything needed for regular maintenance.
Safety Equipment
Never compromise on safety during firearm maintenance. Keep these items within reach:
- Safety glasses to protect your eyes from cleaning solvents
- Nitrile gloves to protect your hands from chemicals
- Well-ventilated workspace to avoid inhaling fumes
- Adequate lighting to inspect all components thoroughly
Safety Verification Before Cleaning
Safety must always come first when handling any firearm. The official Glock guidelines on proper cleaning emphasize verification before beginning any maintenance.
Remove all ammunition from your work area. Store it in a separate room or secured container where it cannot accidentally come into contact with your firearm.
Point the muzzle in a safe direction and remove the magazine. Lock the slide to the rear and visually inspect the chamber. Insert your finger into the chamber to physically verify it's empty. This redundant checking process prevents tragic accidents.
Many experienced shooters perform this verification process twice as a habit. When you're absolutely certain the firearm is unloaded, you can proceed with confidence.
Field Stripping Your Glock
Understanding how to properly disassemble your Glock is fundamental to the cleaning process. Glock pistols are designed for simple field stripping that requires no tools for routine maintenance.
Step-by-Step Disassembly Process
- Remove the magazine and verify the chamber is empty
- Pull the slide back slightly (approximately 1/8 inch)
- Pull down both slide lock tabs simultaneously on each side
- Ease the slide forward and off the frame rails
- Remove the recoil spring assembly from beneath the barrel
- Lift the barrel up and out of the slide
The entire field strip takes less than 30 seconds once you're familiar with the process. For detailed visual guidance, you can reference step-by-step Glock disassembly instructions that break down each movement.
| Component | Removal Order | Key Tip |
|---|---|---|
| Magazine | First | Always remove first |
| Slide assembly | Second | Pull back slightly before releasing tabs |
| Recoil spring | Third | Control tension as you remove |
| Barrel | Fourth | Lift from chamber end |
Never force any component during disassembly. If something doesn't move smoothly, stop and reassess your technique. Glock pistols are engineered for intuitive takedown.
Cleaning the Barrel
The barrel deserves meticulous attention because accuracy and reliability depend on a clean bore. Residue buildup affects both performance and longevity.
Bore Cleaning Technique
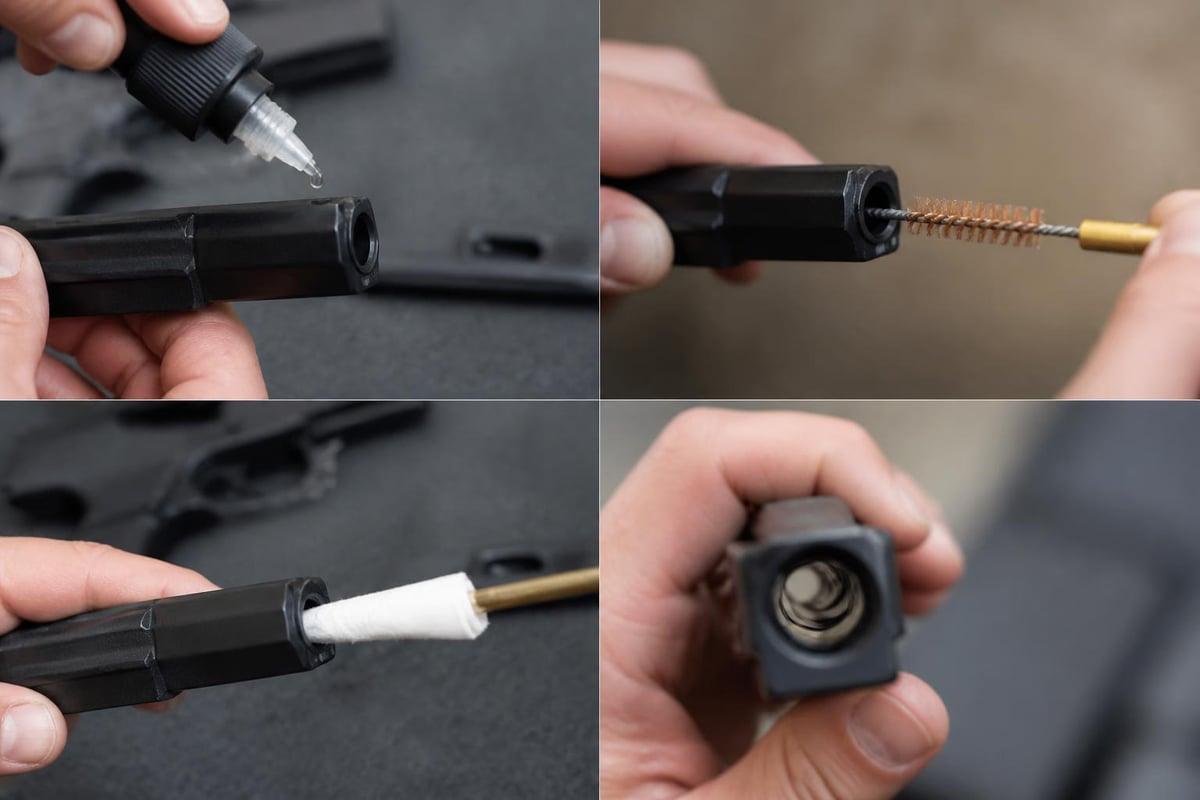
Attach a bore brush to your cleaning rod and apply gun solvent liberally. Run the brush through the barrel from the chamber end toward the muzzle. This direction prevents carbon and copper fouling from being pushed into the chamber.
Make 10-15 passes with the solvent-soaked brush, allowing the chemicals to break down residue. Let the solvent sit for 3-5 minutes for heavy fouling.
Follow the brushing with clean patches pushed through the bore. Continue running patches until they emerge clean without visible residue. Inspect the bore under good lighting to verify complete cleaning.
A bore snake offers a faster alternative for light cleaning sessions. The brush and swab sections combined in one tool make quick work of routine maintenance between deep cleanings.
Cleaning the Slide Assembly
The slide contains critical components that require thorough cleaning but gentle handling. Carbon buildup in the breech face and extractor channel causes malfunctions if left unchecked.
Spray solvent on the breech face and use a nylon brush to scrub carbon deposits. Pay special attention to the extractor and its channel, where brass particles accumulate. A dental pick or cotton swab reaches into tight spaces around the firing pin aperture.
Key Slide Components to Address
- Breech face: Remove all carbon buildup
- Extractor channel: Clean thoroughly to maintain ejection reliability
- Firing pin channel: Wipe clean of debris
- Sight dovetails: Remove dirt and lint accumulation
- Rail grooves: Clean where slide contacts frame
Wipe the entire slide interior and exterior with a solvent-dampened cloth. The exterior should be cleaned but not heavily lubricated, as excess oil attracts dust and debris.
Cleaning the Frame and Magazine
The polymer frame requires less intensive cleaning than metal components, but proper maintenance prevents feeding issues and ensures smooth operation.
Wipe down the frame's interior with a lightly dampened cloth. Remove any unburned powder, lint, or debris from the magazine well and trigger assembly. The rails that guide the slide deserve special attention.
Magazine Maintenance
Magazines often get overlooked during cleaning sessions, but they're critical to reliability. Wipe down the exterior and follower if accessible. Most shooters don't disassemble Glock magazines for routine cleaning, but inspect the feed lips for damage and the spring for proper tension.
For pistols used in dusty or dirty environments, occasional magazine disassembly and cleaning prevents feeding failures. Understanding proper handgun cleaning techniques helps maintain every component that affects reliability.
Recoil Spring and Guide Rod Cleaning
The recoil spring assembly captures powder residue and carbon particles during firing. This component is simple to clean but essential for proper cycling.
Wipe the guide rod with a solvent cloth to remove residue buildup. Inspect the spring for wear, damage, or permanent compression. Springs should be replaced every 5,000-7,000 rounds depending on ammunition and usage patterns.
Some Glock models use dual recoil springs. Ensure both springs are properly seated on the guide rod during reassembly. Clean metal guide rods thoroughly; polymer guide rods need only basic wiping.
Lubrication Points and Application
Proper lubrication is just as important as cleaning when learning how to clean a Glock pistol. Too much lubricant attracts dirt, while too little causes accelerated wear.
Critical Lubrication Points
Apply small drops of quality gun oil to these specific locations:
- Barrel hood (top exterior where it locks into slide)
- Barrel lugs (bottom where barrel contacts slide)
- Frame rails (four contact points where slide rides)
- Connector and trigger bar (single drop)
- Slide rails (inside grooves)
| Component | Oil Amount | Application Method |
|---|---|---|
| Barrel exterior | 2-3 drops | Spread with finger |
| Frame rails | 1 drop each | Apply directly |
| Slide rails | Thin film | Spread with cloth |
| Trigger mechanism | 1 drop | Apply to pivot points |
Glock's engineering philosophy favors minimal lubrication. After applying oil, wipe away excess until only a thin film remains. The pistol should feel slightly slick but not dripping with oil.
Reassembly Process
Reassembling your Glock reverses the disassembly steps with attention to proper component alignment. Begin by inserting the barrel into the slide, seating it fully into the locking lugs.
Place the recoil spring assembly over the barrel with the smaller diameter toward the barrel. The spring should sit flush against the barrel lug.
Align the slide rails with the frame rails and push the slide rearward smoothly. The slide should glide without resistance if properly lubricated. When the slide reaches full rearward position, release it to move forward into battery.
Function Check Verification
After reassembly, perform a complete function check before loading ammunition:
- Point in a safe direction and pull the trigger (should click)
- Rack the slide and verify the trigger resets
- Pull the trigger again to verify firing mechanism works
- Check that the slide lock engages when you lock it back
- Verify the magazine ejects smoothly when released
These checks confirm proper reassembly and identify any issues before live fire. Many competitive shooters incorporate these specific techniques from resources covering comprehensive Glock cleaning methods into their routine.
Cleaning Frequency and Maintenance Schedule
Understanding when to clean your Glock is as important as knowing the techniques. The frequency depends on usage, environment, and ammunition type.
Recommended Cleaning Intervals
After every range session: Minimum cleaning of barrel and wipe-down prevents corrosive buildup from primers and powder residue. Even 50 rounds deposits enough material to warrant basic maintenance.
Every 250-500 rounds: Perform thorough field strip cleaning addressing all components. This interval suits most recreational shooters who practice monthly.
Monthly for carry guns: Pistols carried daily accumulate lint, dust, and moisture even without firing. A monthly inspection and light cleaning maintains readiness.
After exposure to moisture or harsh conditions: Rain, snow, or dusty environments demand immediate cleaning to prevent corrosion or reliability issues.
Competition shooters often clean between match stages for maximum reliability. Defensive firearms may go longer between deep cleanings if properly stored, but inspection should be frequent. For specific guidance, resources explaining how often to clean your Glock provide usage-based recommendations.
The traditional upland hunting experiences offered through partnerships with destinations like Heartland Lodge demand reliable firearms that function flawlessly in field conditions. Regular maintenance ensures your sidearm performs whether you're at the range or in challenging outdoor environments.

Common Cleaning Mistakes to Avoid
Even experienced shooters sometimes develop counterproductive habits during firearm maintenance. Recognizing these errors prevents damage and maintains optimal performance.
Over-Lubrication Issues
Excess oil migrates into trigger assemblies, affecting pull weight and creating sticky buildup. It also attracts dust that forms an abrasive paste accelerating wear. Apply minimal amounts and wipe away excess.
Using Incorrect Cleaning Products
Household cleaners, WD-40, and automotive oils lack properties formulated for firearms. They may damage polymer components or fail to protect against corrosion. Invest in quality gun-specific products from reputable firearms retailers.
Neglecting Small Components
Extractors, firing pin channels, and magazine springs need attention. These small parts cause the majority of malfunctions when dirty or worn. Include them in every thorough cleaning session.
- Forcing components during assembly or disassembly
- Cleaning from muzzle to chamber (pushes debris wrong direction)
- Skipping function checks after reassembly
- Using metal brushes on polymer components
- Storing firearms while still wet with solvent
Special Cleaning Considerations
Certain situations demand modified cleaning approaches beyond standard maintenance procedures.
After Corrosive Ammunition
Older military surplus ammunition uses corrosive primers containing salts that attract moisture. These primers require immediate cleaning with water-based solutions followed by standard cleaning and heavy lubrication.
Flush the barrel and chamber with hot water, then dry thoroughly before applying solvent. This neutralizes corrosive residue before it etches metal surfaces.
Suppressed Pistol Cleaning
Suppressors increase carbon and powder residue in the action significantly. Pistols run with silencers need more frequent cleaning, often after every range session regardless of round count.
Pay extra attention to the breech face, barrel hood, and slide rails where carbon buildup accelerates. Some shooters increase lubrication slightly for suppressed fire to combat increased friction.
Long-Term Storage Preparation
Firearms stored for extended periods need protective measures beyond routine cleaning. After thorough cleaning and lubrication, apply a thin coat of rust preventive oil to all metal surfaces.
Store in a climate-controlled environment with desiccants to absorb moisture. Inspect every 3-6 months even without use, refreshing preservation oil as needed.
Advanced Maintenance and Inspection
Learning how to clean a Glock pistol thoroughly includes recognizing when components need replacement or professional service.
Parts Inspection During Cleaning
Each cleaning session offers opportunity to evaluate component condition:
| Component | Inspection Focus | Replacement Indicator |
|---|---|---|
| Recoil spring | Tension and length | Loss of height or compression |
| Extractor | Spring tension | Brass shavings or ejection issues |
| Firing pin spring | Resistance | Light primer strikes |
| Magazine spring | Feeding pressure | Failure to feed last rounds |
| Sights | Tightness | Movement or looseness |
Small parts kits available from manufacturers provide replacement springs and pins for routine wear items. Maintaining spare parts ensures you can address issues immediately.
When to Seek Professional Service
Most Glock maintenance falls within owner capabilities, but certain situations warrant professional attention. Persistent malfunctions after cleaning, damaged frame rails, or broken trigger components require armorer expertise.
Annual inspection by a certified armorer identifies wear patterns and potential failures before they occur. This preventive approach suits duty and defensive firearms where reliability is non-negotiable.
Understanding state regulations around firearm ownership and maintenance, such as those outlined in North Carolina gun laws, helps ensure compliance with all legal requirements.
Building a Cleaning Routine
Consistency in maintenance develops into habit that preserves firearm condition and prevents neglect. Creating a structured routine removes guesswork from the process.
Designate a specific workspace with all cleaning supplies organized and accessible. This dedicated area makes cleaning sessions more efficient and ensures you don't skip steps due to missing materials.
Sample Cleaning Schedule
Post-range routine (20 minutes): Field strip, clean barrel, wipe slide and frame, light lubrication, reassemble, function check.
Monthly carry gun service (30 minutes): Complete field strip, detailed component cleaning, inspection for wear, proper lubrication, function verification.
Quarterly deep maintenance (45 minutes): Full disassembly for inspection, thorough cleaning of all parts, replacement of worn components, documentation of round count.
Many shooters log maintenance in notebooks or apps tracking round counts, parts replacements, and any issues encountered. This documentation reveals patterns and predicts future service needs.
Resources like video tutorials demonstrating proper Glock cleaning procedures complement written guides, showing techniques in real-time motion.
Cleaning Different Glock Generations and Models
While the fundamental cleaning process remains consistent across Glock's lineup, slight variations exist between generations and models.
Generation Differences
Gen 3, Gen 4, and Gen 5 Glocks share similar internal components but feature different recoil spring assemblies. Gen 4 and Gen 5 use dual recoil springs requiring attention to proper orientation during reassembly.
Gen 5 models with front serrations and the Glock Marksman Barrel benefit from the same cleaning techniques but may show different wear patterns over time. The updated rifling in newer barrels sometimes cleans more easily than earlier polygonal rifling.
Model-Specific Considerations
Compact and subcompact models (G19, G26, G43) have shorter barrels requiring fewer brush strokes but the same attention to detail. Full-size models (G17, G22) provide easier access to components during cleaning.
Competition models like the G34 often feature aftermarket triggers and connector assemblies. These modifications may require specialized cleaning approaches based on manufacturer specifications. Always consult modification documentation before cleaning modified firearms.
The .45 ACP models (G21, G30) accumulate more powder residue due to larger case capacity and slower-burning powders. These calibers benefit from slightly more aggressive initial cleaning before standard maintenance procedures.
Mastering how to clean a Glock pistol properly ensures your firearm delivers the legendary reliability Glock is known for, whether you're training at the range, competing in matches, or carrying for personal defense. Regular maintenance prevents malfunctions, extends component life, and maintains accuracy that shooters depend on. When you need quality firearms, ammunition, or accessories to complement your well-maintained Glock, RCS Outdoors offers a comprehensive selection of products backed by expertise in helping shooters maintain peak performance from their equipment.


